Setting up a new tattoo machine for the first time can seem like a complex task, especially for those new to the art of tattooing. The accompanying video offers a concise visual guide to assembling a beginner tattoo kit, demonstrating the key steps involved. This supplementary article aims to expand upon these instructions, providing further detail, crucial context, and essential advice for tattoo beginners to ensure a safe and successful start.
A properly assembled tattoo machine is fundamental not only for smooth operation but, more importantly, for safety and hygiene. This guide, designed to complement the video’s visual demonstrations, will walk through each step, elaborating on best practices and common considerations for aspiring tattoo artists using a complete tattoo machine kit.
Unboxing Your Beginner Tattoo Kit: Initial Checks
Upon receiving your beginner tattoo kit, the very first step involves a thorough inspection of all included items. It is advised that the number and package of items are carefully checked against the kit’s inventory list. Any discrepancies or damaged components should be noted immediately.
Reputable manufacturers, such as those providing the ITATOO Complete Tattoo Machine Kit, generally offer support for such issues. For instance, the video’s on-screen text highlights that quality or quantity problems warrant direct contact with the supplier for assistance. This initial verification ensures that all necessary parts are present and in good condition before assembly begins, preventing potential frustrations later on.
Assembling Your Tattoo Machine: Step-by-Step Guidance
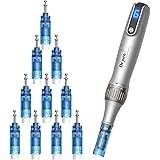
The core of preparing your beginner tattoo kit involves the precise assembly of the tattoo machine itself. Each component plays a vital role in the machine’s functionality and the tattooing process. Adherence to correct assembly procedures is paramount.
Securing the Tube, Handle, and Stainless Tip
The foundational components of the tattoo machine’s grip system are the tube, handle, and stainless tip. These elements are designed to be securely fastened to the machine body. As demonstrated in the video, an Allen key is typically used to tighten the tube and handle into place. This firm attachment is crucial for stability during tattooing, preventing unwanted movement that could affect line work or depth.
Similarly, the stainless tip is also tightened using the same method. The tip guides the tattoo needle, making its secure positioning vital for precise ink delivery. It has been observed in various beginner setups that loose components can lead to inconsistent tattooing and potential injury, underscoring the importance of adequate tightening without over-stressing the parts.
Inserting the Tattoo Needle and Fixing the Grommet
With the grip and tip in place, attention is turned to the tattoo needle. The buckle on the machine is typically loosened to allow for the careful insertion of the tattoo needle. Needles are single-use, sterile items and should only be handled with gloved hands to maintain sterility.
Once the needle is positioned, a grommet must be fixed to the armature bar. This small rubber component serves a critical purpose: it securely holds the needle bar in place and reduces vibration. Without a properly fitted grommet, the needle can move erratically, leading to poor tattoo quality and potential damage to the machine or skin. Proper grommet placement ensures a smoother, more controlled needle stroke.
Adjusting the Needle Length
Controlling the needle length, or protrusion, is a key skill for any tattoo artist. The video illustrates this by showing the buckle being released to adjust the position of the aluminum tube. This adjustment dictates how far the needle extends beyond the tip.
For beginners, it is often recommended to start with a needle protrusion of about 1-2 millimeters. This allows for better visibility of the needle’s interaction with the practice skin and reduces the risk of tattooing too deeply. While specific protrusion lengths may vary depending on the technique and needle type, understanding this adjustment mechanism is fundamental to achieving desired results and preventing skin trauma.
Powering Your Tattoo Machine: Connections and Checks
Once the mechanical assembly of the tattoo machine is complete, the next critical phase involves connecting it to its power source. This ensures the machine functions correctly and safely.
Connecting the Foot Pedal and Tattoo Machine
Most beginner tattoo kits include a power supply, a clip cord, and a foot pedal. The foot pedal provides on-demand power to the machine, allowing the artist to control its operation. The video clearly indicates dedicated ports for both the foot pedal and the tattoo machine on the power supply unit. It is imperative that the clip cord, which connects the machine to the power supply, and the foot pedal cord are inserted into their correct respective jacks.
Misconnections can lead to the machine not functioning, or, in rare cases, potential damage to the power supply or machine. Careful attention during this step avoids basic operational hurdles for the tattoo beginner.
Checking Power Supply Functionality
Before any tattooing (even on practice skin) commences, it is strongly advised to “check the power supply can work normally first.” This often involves turning on the power supply and observing its display (if present) to ensure it powers up correctly and shows appropriate voltage readings. A brief test, such as tapping the foot pedal to hear the machine buzz, can confirm connectivity and basic functionality.
Issues such as no power, flickering displays, or unusual noises should be investigated. As mentioned in the video’s “Little Tips,” any quality problems should be directed to the manufacturer, reinforcing the importance of a fully functional power supply for a smooth tattooing experience.
Essential Considerations for Tattoo Beginners
Beyond basic assembly, a comprehensive understanding of core principles is vital for anyone embarking on their tattooing journey. This includes hygiene, practice, and responsible use of equipment.
Prioritizing Hygiene and Sterilization
The most critical aspect of tattooing, especially for beginners, is maintaining strict hygiene and sterilization protocols. A significant percentage of tattoo-related infections, estimated to be up to 1-5% in some studies, are linked to improper sterile techniques. Every component that comes into contact with the skin, such as needles and tips, must be sterile and single-use where appropriate.
Cross-contamination is a serious risk; therefore, barrier methods (e.g., plastic wrap for machine and cables), disposable gloves, and medical-grade disinfectants are non-negotiable. While a beginner tattoo kit provides the tools, the responsibility for a sterile environment rests entirely with the user. It is widely acknowledged that proper aseptic technique is the cornerstone of safe tattooing.
The Importance of Practice Skin
A common mistake made by new tattoo artists is to begin tattooing on human skin too early. Professional instructors universally advocate for extensive practice on synthetic skin or other suitable mediums before moving to live canvases. This allows for the development of hand-eye coordination, understanding needle depth, and mastering various techniques without causing irreversible damage or discomfort.
Studies on skill acquisition suggest that deliberate practice with immediate feedback leads to faster and more effective learning. Utilizing practice skins minimizes waste of costly supplies and builds confidence, greatly reducing the potential for error when transitioning to real skin.
Understanding Voltage and Machine Speed
The power supply allows for voltage adjustment, which directly influences the tattoo machine’s speed and force. For line work, a higher voltage (and thus faster machine speed) is often preferred, typically ranging from 7-9 volts. For shading and coloring, a slightly lower voltage (6-8 volts) might be used to allow for smoother transitions and less skin trauma. These are general guidelines, as optimal voltage can vary based on the machine type, needle configuration, and artist preference.
Beginners are advised to experiment with different voltage settings on practice skin to understand their impact. Over-voltage can lead to excessive skin damage, while under-voltage may result in poor ink saturation. Learning to control this variable is a fundamental aspect of producing quality tattoos.
Support and Troubleshooting for Your Beginner Tattoo Kit
Even with clear instructions, questions or issues can arise. The “Little Tips” provided in the video transcript offer valuable guidance on where to seek help, reinforcing the support structure often available for new users of a beginner tattoo kit.
Should any quality or quantity problem arise, direct communication with the supplier is the recommended course of action. This ensures that expert assistance can be provided, addressing concerns about missing components or malfunctioning equipment. Furthermore, while the kit’s included instructions offer general assembly guidance, specific operational difficulties or advanced questions should also be directed to the support team. It is noted that a free replacement service for tattoo machines, tattoo foot pedals, and clip cords is often provided during a specified period, typically six months, offering peace of mind to new users. This commitment to customer service helps alleviate common anxieties associated with purchasing new equipment.
Navigating Your Wormhole Tattoo Kit: Beginner Q&A
What should I do first when I unbox my new beginner tattoo kit?
You should carefully check all included items against the kit’s inventory list. If anything is missing or damaged, contact the supplier immediately for assistance.
How do I secure the tattoo needle in the machine?
First, carefully insert the sterile needle into the machine after loosening the buckle. Then, fix a small rubber grommet onto the armature bar to hold the needle securely and reduce vibration.
How do I connect my tattoo machine to its power source?
Connect the tattoo machine’s clip cord and the foot pedal cord into their correct, dedicated ports on the power supply unit. After connecting, turn on the power supply to ensure it functions normally.
Why is it important to use practice skin before tattooing real skin?
Practicing on synthetic skin allows you to develop essential skills like hand-eye coordination and understanding needle depth without causing permanent damage. It helps you build confidence and refine techniques safely.
What is the most important thing to remember about hygiene when using a tattoo kit?
Maintaining strict hygiene and sterilization protocols is critical to prevent infections. Always use sterile, single-use items, wear disposable gloves, and use barrier methods for your equipment and workspace.