Aspiring tattoo artists often face a daunting challenge: where to begin? With an overwhelming array of equipment and an industry traditionally guarded by long apprenticeships, the path to learning how to tattoo can seem impassable. Yet, as our accompanying video highlights, a clear, structured approach can demystify the process, potentially transforming a complete beginner into a competent artist capable of good designs in as little as 30 days. This rapid progression, previously unheard of in the industry, underscores the power of focused, curriculum-based learning, a method embraced by a thriving community of nearly 100,000 like-minded individuals.
This article builds upon the foundational insights shared in the video, providing an expanded guide for anyone ready to embark on their tattooing journey. We’ll delve deeper into the essential equipment you need, discuss the critical importance of a structured learning path, and explore how dedicated practice and a supportive community can accelerate your growth. Forget the notion that you need to overcomplicate things with expensive gear or spend years searching for a traditional apprenticeship. The truth is, with the right tools and a smart learning strategy, your artistic transformation can begin today.
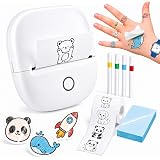
Demystifying Your First Tattoo Equipment Kit
One of the biggest misconceptions for beginners is the sheer volume of equipment believed to be necessary to start tattooing. The reality, as emphasized in the video, is far simpler. You don’t need a studio full of high-tech gear from day one; rather, a carefully selected set of core essentials will get you started efficiently and effectively. Think of it like learning to drive: you need a functional car and the basic controls, not a souped-up racing machine with all the bells and whistles.
The Core Essentials for Aspiring Tattoo Artists
When assembling your initial setup, focus on functionality and hygiene, even when practicing on fake skin. You’ll need practical items like tissues or wet wipes for keeping your workspace tidy and mimicking a real tattooing environment. A small selection of high-quality inks is crucial; starting with black and gray is recommended, as these colors are ideal for mastering fundamental techniques that translate across all styles, whether you eventually move to vibrant hues or stick to monochromatic art. This approach ensures you build a strong technical foundation without the added complexity of color theory upfront.
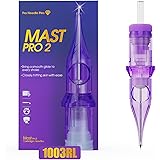
Needles are another vital component, and the video correctly points out the need for a varied selection. Liners are for creating crisp, defined outlines, while round shaders and magnums are designed for packing color and achieving smooth gradients. Having multiple sizes within each type allows you to experience different line weights and shading textures, preparing you for the versatility required in actual tattoo work. Your machine and power supply are the heart of your kit; battery-powered machines offer convenience by eliminating cables, but a cabled machine with a separate power pack works just as well. The key is to choose a reliable machine that allows for consistent needle movement, which is paramount for clean and controlled tattooing.
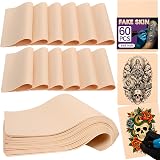
Perhaps the most critical item for a beginner is fake skin. Forget the outdated advice of tattooing fruit; modern fake skins are engineered to mimic human skin texture, providing a realistic canvas for practice. Investing in good quality fake skins from reputable suppliers is essential, as cheaper alternatives can feel unrealistic and hinder your progress. Furthermore, ink cups are necessary for holding your ink safely, and using ointment during practice is a great habit to develop. While not for real skin initially, ointment keeps the practice area moist, aiding in needle glide and maintaining a cleaner surface, mirroring the real-world application of tattoo aftercare products.
Beyond the Basics: Enhancing Your Workspace
While the initial setup focuses on the bare essentials, certain items, as mentioned in the video, significantly improve your practice environment and help build good habits. Stencil supplies, including thermal paper and transfer solution, are indispensable for accurately applying designs to your fake skin. Learning to create and apply stencils properly is a fundamental skill, as it ensures your design translates faithfully from paper to canvas. Wrapping your machine and workstation with protective barriers, like machine wraps and station wrap, might seem excessive when not working on actual clients, but it instills crucial hygiene protocols. This practice trains you to set up a sterile environment, a non-negotiable aspect of professional tattooing that prevents cross-contamination and ensures client safety.
Lastly, an armrest, while not strictly necessary on day one, is a game-changer for realistic practice. Working off a flat table surface is unrealistic and limits your ability to maneuver. An adjustable armrest allows you to manipulate the angle of your fake skin, simulating the varied contours of the human body. This adaptive practice helps you develop the ergonomics and body positioning necessary for comfortable and effective tattooing on real clients. Incorporating an armrest into your setup a few weeks or months into your journey can significantly bridge the gap between flat-surface practice and the complexities of tattooing on curves and limbs.
Why a Structured Curriculum is Key to Learning How to Tattoo
The journey to becoming a proficient tattoo artist is often framed as a mystical quest for an apprenticeship or a haphazard adventure through countless online tutorials. However, as the video powerfully argues, a structured curriculum is the most efficient and effective route to mastery. Just as you wouldn’t expect to learn advanced mathematics by randomly flipping through textbooks, learning to tattoo requires a sequential, progressive approach that builds skills methodically.
The Pitfalls of Unstructured Learning for Beginners
Relying solely on scattered YouTube videos or “trial and error” can lead to significant frustration and wasted time. Imagine trying to navigate an unknown city without a map or GPS, simply driving down random streets hoping to stumble upon your destination. This is akin to jumping from a linework tutorial one day, to a shading video the next, and then attempting stencils without understanding the underlying principles. Such an unstructured approach often results in fragmented knowledge, poor technique development, and a lack of confidence. It can foster bad habits that are incredibly difficult to unlearn, ultimately slowing down your progress and potentially leading to subpar results.
Moreover, the traditional apprenticeship model, while valuable for some, is notoriously difficult to secure. Many aspiring artists find themselves in a catch-22: needing experience to get an apprenticeship, but unable to get experience without one. Even when apprenticeships are found, their quality can vary widely, and they often involve years of non-tattoo-related tasks before a machine is even touched. This makes a structured, self-paced curriculum a compelling alternative, especially for those who are highly motivated and disciplined. It democratizes access to quality tattoo education, bypassing the gatekeepers and offering a direct path to skill acquisition.
A Blueprint for Rapid Progression: The 30-Day Tattoo Challenge
The video introduces a revolutionary concept: a 30-day program designed to take a complete novice to a competent tattooist. This rapid progression is not about shortcuts, but about strategic learning—a “satnav” for your tattooing journey. The curriculum begins with the absolute basics, like simply holding the machine and understanding its feel. From there, it moves into crucial theoretical aspects such as hand and machine speed, which dictates line consistency and ink saturation. This foundational knowledge is then applied to the simplest form of tattooing: straight lines, ensuring that your earliest attempts build a solid base of control and precision.
The curriculum doesn’t stop at lines. It systematically introduces curved lines and circles, gradually increasing complexity while reinforcing previous lessons. This progressive learning is akin to building a house brick by brick, ensuring each layer is stable before adding the next. By isolating and mastering individual elements, aspiring artists can quickly build a comprehensive skill set. The promise of being able to produce “really good designs in one month” stems from this meticulously planned sequence, allowing for concentrated effort and rapid skill acquisition rather than diluted, sporadic practice.
Mastering Fundamental Tattoo Techniques Through Drills
The core of any effective learning curriculum, especially for a hands-on skill like tattooing, lies in repetitive, focused practice—what the video refers to as “drills.” These exercises are designed not for creating beautiful art immediately, but for isolating specific techniques and forcing improvement by making every mistake glaringly obvious. This intense, unglamorous practice is the crucible in which true skill is forged, much like an athlete’s endless repetitions of basic movements before a competition.
Laying the Foundation: Line Work Mastery
Beginning with line work drills is paramount because lines are the backbone of almost every tattoo design. These drills involve consistently tattooing straight lines, then progressively curved lines, and finally circles, all while maintaining uniform depth, speed, and pressure. The beauty of drills is their unforgiving nature; any wobble, inconsistency, or hesitant movement becomes starkly apparent on the fake skin. This immediate feedback loop is invaluable, as it compels you to identify and correct your errors, thereby accelerating your learning curve. Focusing solely on drills initially prevents the distraction of complex designs, allowing you to dedicate all your concentration to perfecting the mechanics of your machine and your hand movements.
Once a foundational competence in line work is established through countless drills, the curriculum then guides you towards incorporating these mastered techniques into simple designs. These early designs are specifically chosen to reinforce what you’ve learned, acting as practical applications of your drilled skills. They allow you to transition from isolated movements to integrated artistic expression, helping you understand how lines form cohesive shapes and images. This step is a crucial bridge, moving you from mechanical repetition to intentional creation, all while keeping the focus strictly on line work before introducing the complexities of shading.
The Art of Shading: From Dot Work to Magnums
With line work under control, the next major hurdle is shading. The curriculum tackles this by first introducing the theory behind shading, exploring what makes areas appear darker or lighter. Pointillism, or dot work, serves as the ideal entry point into shading techniques. This method involves creating areas of varying darkness by adjusting the density of individual dots, providing an intuitive way to understand light and shadow without the immediate pressure of complex gradients. Dot work drills allow for precise control over tone, teaching you how to build up density and create smooth transitions solely through dot placement.
Following dot work, the curriculum progresses to more advanced shading methods using different needle configurations. Whip shading involves flicking the needle quickly to create soft, gradient effects, ideal for subtle transitions. Brush shading uses a similar principle but with more overlap for smoother, blended results. Packing refers to saturating an area with solid color. Each of these techniques is first practiced with the round shader needle, a versatile tool that helps consolidate your understanding of shading mechanics. Then, you’ll apply these methods using magnum needles, which are designed for covering larger areas with smooth, even shading. The systematic progression from theory, to dot work, to various shading methods with different needles ensures a holistic understanding, turning what seems complex into a series of manageable, learnable steps.
Cultivating Your Craft: Practice, Repetition, and Community
Becoming a proficient tattoo artist is not merely about acquiring equipment or passively watching tutorials; it’s an active process demanding consistent practice, unwavering repetition, and often, the support of a community. The video underscores that while talent plays a role, diligent effort and strategic learning are the true accelerators of skill development. It’s a journey that builds muscle memory and intuitive understanding, much like a musician practicing scales until they can play a symphony without conscious thought.
The emphasis on repetition through drills is not just about perfection; it’s about creating competence until the actions become second nature. When you no longer have to consciously think about machine speed, hand pressure, or needle depth, your mind is freed to focus on the artistic aspects of the tattoo—the design, the flow, the client’s skin. This state of effortless execution, where you are “competent at doing this once you don’t have to think,” is the ultimate goal of progressive learning. It allows you to transform from someone struggling with basic mechanics to an artist who can translate vision into reality with fluidity and precision.
Beyond individual practice, the video also highlights the invaluable asset of a supportive community. Finding a space where like-minded individuals, all on a similar learning path, can share experiences, ask questions, and offer encouragement is crucial. Unlike many industry forums characterized by negativity and criticism, a truly positive community fosters growth and mutual upliftment. This collective environment provides a safe haven to share your progress, receive constructive feedback, and celebrate small victories, reinforcing motivation and combating the isolation that can sometimes accompany intense self-study. It’s a testament to the idea that while you are learning individually, you are not alone on your journey to master the art of tattooing.
Getting Under the Skin: Your Tattooing Q&A
What is the best way for a beginner to start learning how to tattoo?
The most effective way is to follow a clear, structured learning path with a curriculum. This methodical approach helps you build skills progressively and avoid common pitfalls of unstructured learning.
What essential equipment do I need to start practicing tattooing?
For beginners, focus on core essentials like a reliable tattoo machine, black and gray inks, various needles, ink cups, and high-quality fake skin for practice.
Why is practicing on fake skin important for new tattoo artists?
Fake skin is crucial because it’s engineered to realistically mimic human skin texture. This provides an ideal canvas to practice and master fundamental techniques like linework and shading effectively.
Do I need a lot of expensive equipment to begin learning how to tattoo?
No, a common misconception is needing a studio full of high-tech gear. You only need a carefully selected set of core essential equipment to start efficiently and effectively.